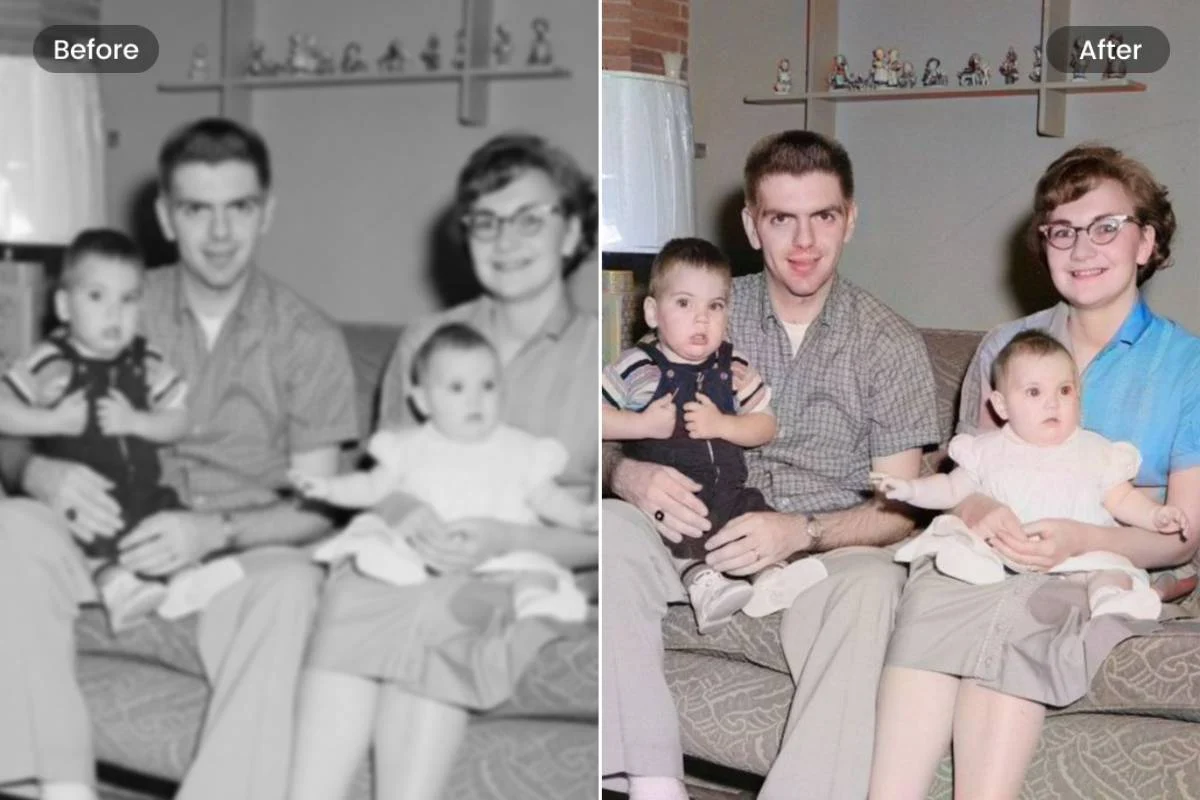
Tucked away in dusty albums and forgotten boxes lie our most precious memories: old family photos. These faded, creased, and sometimes blurry images are windows into our past. But time isn’t always kind to them. What if you could breathe new life into these cherished moments, restoring them to their former glory with just a few taps on your phone?
Thanks to the power of artificial intelligence, that’s no longer a fantasy. Today, anyone can **restore old family photos with AI**, fixing everything from faded colors to scratches and blur. This guide will walk you through the entire process, from properly digitizing your physical photos to using the best AI tools to achieve stunning results. Let’s bring those memories back to life.
Step 1: Digitize Your Old Photos The Right Way
Before any AI magic can happen, you need a high-quality digital copy of your physical photo. The quality of your scan will directly impact the quality of your restoration. A simple picture of a picture will work, but for the best results, use one of these methods.
- Use a Flatbed Scanner: This is the gold standard. If you have access to a flatbed scanner, it will give you the sharpest, most evenly lit digital image. Scan at a high resolution—at least 600 DPI (dots per inch).
- Use a Dedicated Scanner App: If you don’t have a scanner, the next best thing is a scanner app on your phone. We recommend **Google PhotoScan**. It intelligently captures the photo from multiple angles to remove glare and correct perspective, giving you a much better result than just using your regular camera app.
Step 2: Choose Your AI Restoration Tool
This is where the restoration happens. Different apps excel at different tasks. For this guide, we’ll focus on three top-tier, safe applications that you can use in combination for the best results.
- Remini: Best for enhancing faces and fixing blur.
- Snapseed: Best for removing scratches and manual color correction.
- PicsArt: Best for automatic colorization.
We’ll now walk through how to use each one in a logical workflow. For an even deeper analysis of the available tools, check out our list of the best AI photo editing apps.
Step 3: The AI Restoration Workflow (A Step-by-Step Guide)
For the ultimate restoration, we recommend using the apps in this specific order.
Part A: Remove Scratches & Blemishes with Snapseed
Before you enhance the details, it’s best to clean up any physical damage like dust, spots, or creases. Google’s Snapseed has a phenomenal and free tool for this.
- Open your scanned photo in Snapseed.
- Go to Tools > Healing.
- Use your finger to “paint” over a scratch or a dust spot. The AI will intelligently analyze the surrounding area and make the blemish disappear.
- Zoom in and work on small areas at a time for the most accurate results. Save the photo when you’re done.
Part B: Enhance Facial Details & Fix Blur with Remini
Now that your photo is clean, it’s time to sharpen it. Remini’s AI is specifically trained on faces, making it unbeatable for this task.
- Open your newly saved, scratch-free photo in Remini.
- Select the “Enhance” feature. The AI will analyze the image, focusing on faces, and dramatically increase the clarity and detail.
- Compare the “Before” and “After” using the slider. You’ll be amazed at how much detail it recovers.
- Save the enhanced photo to your device. You can use the free version, which typically requires watching a short ad. It’s well worth it for the result. We discuss the app’s safety in our Remini Pro APK guide.
Part C (Optional): Add Color with an AI Colorizer
If you are working with a black and white photo, adding color can be the final touch that truly brings it to life. Several apps can do this, but PicsArt has a very accessible tool.
- Open your sharp, enhanced photo in PicsArt.
- Navigate to Tools > Colorize.
- Let the AI analyze the photo. In seconds, it will apply realistic colors to the scene. The results are often very impressive for a one-tap solution.
- Fine-tune if needed. You can use other PicsArt tools to adjust the saturation or hue if the AI’s colors aren’t perfect.
Final Tips for a Perfect Restoration
- Start with the Best Scan Possible: This cannot be overstated. A clear scan is the foundation of a great restoration.
- Don’t Overdo It: The goal is to enhance, not to make the photo look unnaturally artificial. Sometimes, a little bit of fading adds to the character.
- Save Copies: Always work on a copy of your original scan, so you can go back if you’re not happy with an edit.
To **restore old family photos with AI** is a truly rewarding experience. It connects us with our heritage and preserves our history for future generations to enjoy. With these safe and powerful tools, you have everything you need to become your family’s digital historian.
Editinga photo